

CMU Wall Details – Exterior Finish
CMU Wall Details (concrete masonry unit)
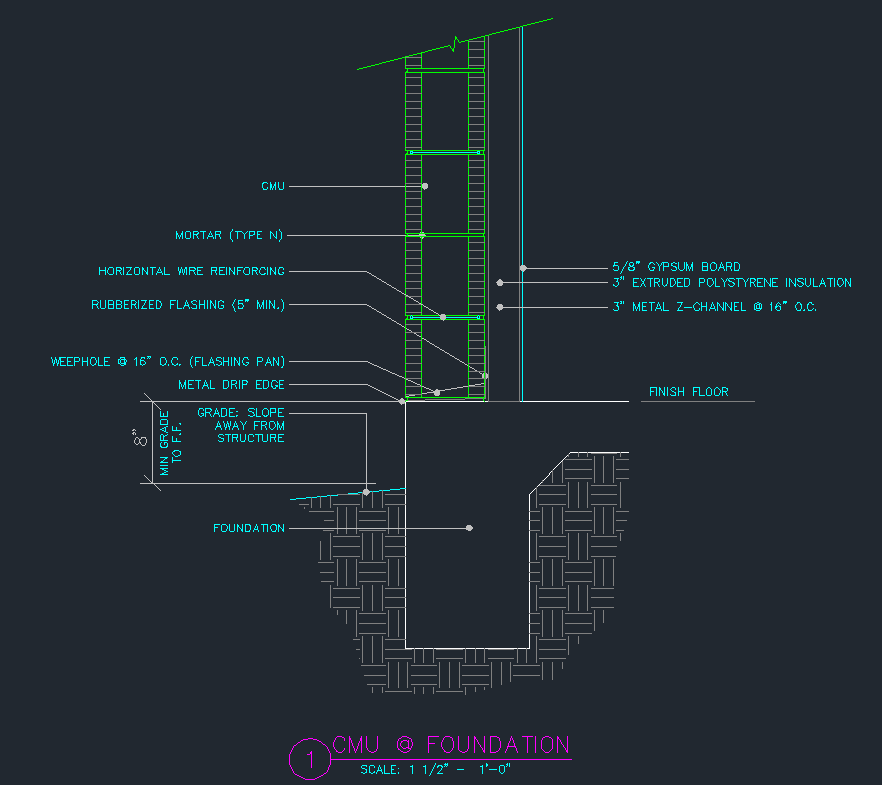
Also known as a concrete block or cinder block. Like brick, this is a durable and time tested material for an exterior finish. CMU is non-combustible, long lasting, can be reinforced to act as a structural element and does not require painting. This is a concrete product vs a clay product (brick), so it has some different characteristics and requires some different installation techniques. The CMU wall drawings and CMU wall details included below are for a single wythe structural CMU wall that also serves as the exterior finish.
CMU is a common used material because it is easy to find, economical and skilled masons are prevalent. CMU is versatile and used for industrial uses, commercial applications as well as residential. There are many styles, colors, sizes and choices with CMU, but they all work in a similar manner. All CMU wall details included are for a standard CMU block.

CMU Sill?
Not required but can be used as another layer of protection against moisture intrusion to the interior.
CMU Wall Moisture protection
CMU requires installation steps to protect the CMU and the interior from moisture intrusion. Water repellents should be specified as post applied as well as integral as part of the CMU and mortar. Drainable cores, flashing and weeping should also be detailed in your drawings and specs.

CMU Flashing
For a single wythe CMU exterior wall, flashing locations are required at the wall base, at window sills, window heads, door heads, top of wall and above any bond beam.
Flashing pans
Located at the wall base and above bond beams, flashing pans should be installed in CMU bed joints and should have integral weeps extending from the center to each pan to the outside face of the CMU to reduce mortar clogging, collect and direct moisture to the exterior. Weep vents should occur every 16″ o.c.
Rubber Base
At the wall base rubberized flashing should be turned up 5” minimum on the interior side of the CMU.
Metal drip edge
Extend the stainless steel metal drip edge a minimum of 3″ horizontally into wall and 1/2″ out
from the exterior face of the wall. Exterior grade should be a minimum of 2″ below the drip edge.
CMU Wall Reinforcing
Reinforcing can vary greatly depending on your structural loads, building heights, openings, etc. so we are only covering some typical structural guidelines. Any and all structures should be engineered by a licensed structural engineer, but we will cover some basic guidelines for these specific details.

Horizontal Reinforcing
There are 2 different types of horizontal reinforcing. The first is with steel rebar reinforcing along lintels and bond beams occurring at the base level, above openings at the top of walls, where framing members transfer loads and at regular intervals for higher walls. The second type of reinforcing is horizontal wire reinforcing.
Horizontal reinforcing (rebar)
Horizontal rebar reinforcing is simply a horizontal row of grout filled CMU with steel rebar. These help stabilize the wall, transfer loads and provide a structural header for spans over openings.
Horizontal Wire Reinforcing
This type of reinforcing actually acts to minimize CMU shrinkage and cracking rather than as a structural member but is still important to include in your details and specs. Horizontal wire reinforcing should occur every 16” (every two rows).
Vertical reinforcing
Reinforcing vertically occurs often and is comprised of vertical steel rebar(s) grouted fully within the cell. These should occur regularly approx. every 48″, at all corners, wall transitions, at the end of a wall, adjacent to any control joints and adjacent to any openings. These should tie into the slab as well as the top level of the wall with a standard hook.
Control joint
The CMU control joints should be spaced at a max 20’. Other areas or guidelines are to place control joints away from openings to allow for reinforcing to be located directly adjacent to opening, closer to the corners, at transitions or changes in wall thickness and changes in wall heights and at all intersections. Stop horizontal reinforcement at control joint.

Insulation
In this example, the CMU is acting the structural piece as well as the exterior finish, so insulation needs to be taken care of either inside the cores as an integral piece, on the interior side of the CMU or both. In the details provided 3″ of extruded polystyrene insulation is installed on the interior. This provides an approx. total R-value of 18. If we insulate the empty cores, we can raise that to well over 20.
CMU Wall Quick facts:
- Mortar Joints: ⅜”
- Mortar Material: Masonry Cement, Mortar Cement or Portland Cement-Lime
- Weight of the wall – Being heavier than wood or metal studs, the foundation needs to be considered as this will add to the scope and costs. Approx. 40-50lbs per block.
- Size: Standard CMU block 16”x8”x8” (minus ⅜” for mortar joints)
- In non temperate climates, and no insulation is required, it can be very cost effective and is widely used.
- Downsides of the material is low R value, low sound protection, weight (needing larger foundations), moisture protection and some maintenance is required.
You must log in to submit a review.
This is great detail